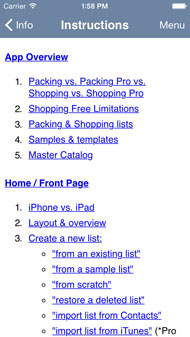
Instructions for Packing, Packing Pro, Shopping & Shopping Pro
App Overview
- Packing vs. Packing Pro vs. Shopping vs. Shopping Pro
- Shopping limitations
- Packing & Shopping lists
- Samples & templates
- Master Catalog
Home / Front Page
- iPhone vs. iPad
- Layout & overview
- Create a new list:
- "from an existing list"
- "from a sample list"
- "from scratch"
- "restore a deleted list"
- "import list from Contacts"
- "import list from iTunes" (*Pro feature)
- "import list from Dropbox, Box, iCloud Drive" (*Pro feature)
- "with Expert help" (*Pro feature--Packing/Packing Pro only)
- Edit lists:
- "Master Catalog"
- "Settings"
- "Info"
Pro-level Special Features
- Full iCloud Auto-sync Support
- CSV Import / Export
- List & Catalog Content File Sharing & Backup
- Huge Master Catalog
- Expert List Generation Tool (*Packing/Packing Pro only)
- Customized Design
- Twice as Many Sample Lists
- Smart Search
- Superior Layout & Navigation
List Management
- List overview
- Add items to a list:
- Delete items:
- Multi-select to Move / Copy / Set Items
- Delete Categories
- Edit Items
- Edit list Category names, icons/emojis & Master Catalog linkage
- Sorting list Items:
- Filtering list Items:
- "Show All"
- "Show Unpacked / Unchecked"
- "Show Packed / Checked"
- "Filter by Need to Buy"
- "Filter by Person"
- "Filter by Bag"
- Sorting list Categories
- Other list functions:
- Check All
- Clear All
- "Open All"
- "Close All"
- "Total"
- Smart Search (*Pro feature)
- List Sharing & Printing
- Checkout function (*Shopping/Shopping Pro only)
Master Catalog Management
- Master Catalog overview
- Add Categories / Types / Items
- Delete Categories / Types / Items:
- Edit Categories / Types / Items
- Edit Item Details
- Move / Copy Types / Items
- Multi-select to Move / Copy / Set Types / Items
- Sort Categories / Types / Items
- "Smart Search" (*Pro feature)
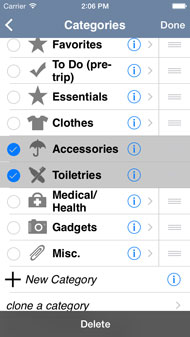
- "Clone a Category"
- Restore deleted Categories
- Restore previous Master Catalogs
Import / Export / Backup
- Import / Export vs. iCloud
- Import / Export overview
- Lists / list Categories:
- Master Catalog / Categories:
- Sharing content between apps
- Sharing content between devices
- Out-of-app, out-of-device backup
- "device-to-device (AirDrop)" (*Pro feature)
- "device-to-computer" (*Pro feature)
- "device-to-anywhere" (*Pro feature)
- Out-of-app, out-of-device editing via CSV (*Pro feature)
- .csv vs .packinglist / .shoppinglist / .listcategory / .catalogcategory / .mastercatalog formats
- "1-tap backup to email" (*Pro feature)
- Merging content
iCloud auto-sync support (*Pro feature)
Alerts
In-app Upgrading & Tip Jar
Problems & Troubleshooting
Feedback, Contact, Privacy Policy & Website Info
Credits
App Overview

- Packing vs. Packing Pro vs. Shopping vs. Shopping Pro
All four of these list-making apps share a lot of common functionality, so I've decided to use a common, combo instruction set for all of them. Please note, though, that the basic Packing (+To Do!) & Shopping apps do not include any of the Pro-level features or content detailed below, unless, of course, in Packing's case, either the 'Pro-features' or 'Pro-full' in-app upgrade has been purchased (Shopping currently doesn't support in-app upgrades). Also, differences between the Packing / Packing Pro apps and Shopping / Shopping Pro apps will also be noted, when necessary.
In general, besides the packing-oriented Master Catalog of the Packing / Packing Pro apps and the food & shopping-oriented Master Catalog of the Shopping / Shopping Pro apps, the main difference between these two sets of apps deals with how items are viewed & managed. Packing / Packing Pro focus on where items should be packed, who they belong to, and how much they weigh or are valued. Shopping / Shopping Pro focus on how much items cost, what taxes may apply, and what the subtotals are per item, category, cart and list.
- Shopping limitations
As a free app, Shopping has just one major limitation: only one shopping list is supported. Therefore, none of the list creation or import / export functions detailed below exist in Shopping, except for the email export of a text list & two file attachments that can be used to transfer lists into Shopping Pro. Shopping Pro does not have any of these limitations.
- Packing & Shopping lists
With this app, you can create as many totally customized packing or shopping lists as you desire (except for Shopping). You can keep track of what's packed/checked/put-in-a-cart and what's not with check marks, as well as sub-total numbers for each category. Each item in the list can also be described with several attributes: image, number, weight, value, need to buy, person, bag, priority, alert and note (for Packing / Packing Pro); image, barcode, number, unit, price, tax name/rate, priority, alert and note (for Shopping / Shopping Pro).
- Samples & Templates
Several examples of typical lists have been provided within the app (one for Shopping, four for Packing, eight for Shopping Pro and nine for Packing Pro). Use any of the Sample Lists, or any of your own existing lists, as a template to create a new list. This is a quick and easy way for getting started on your own new personalized list. See 'In-app Upgrade + Tip Jar' for even more options.
- Master Catalog
Packing has an extensive Master Catalog containing over 400 items and to-do tasks & over 800 for Packing Pro (700+ for Shopping & 1500+ for Shopping Pro). This catalog is organized in a 3-level tree structure (Categories, Types, and Items -- but supports 2-level as well: Categories & Items) which makes item location much easier. The Master Catalog is also 100% customizable, as well.
Home / Front Page
- iPhone vs. iPad
Since Packing, Packing Pro, Shopping & Shopping Pro are all universal apps, they will all run well on either the iPhone, iPod touch or iPad. For the iPhone & iPod touch, only one screen can be displayed at a time, so most of the action will be forward and backward, screen by screen, branching out from the home page. The iPad, though, has a bigger screen and can support two panes at the same time. Most of the menu navigation will occur on the left pane, while the details (lists, catalog entries & info) will be shown on the right. Much of the editing and other actions will occur in popover windows. Besides these differences, the workflow for these apps will be the same across all devices.
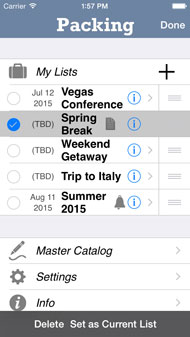
- Layout & overview
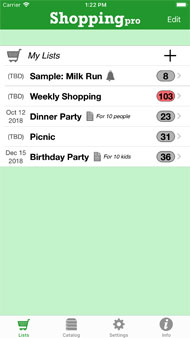
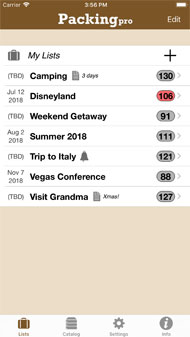
The home page is where you arrive once the app is completely loaded for the first time. On the iPad, this will appear as a menu list on the left. The first item is "My Lists", which will head a group of all of your existing lists (with a number to the right of each list, indicated its remaining, unchecked items). Tap on any of them to enter the specified list detail page, tap on the plus icon to create a new list, or see #4 below to edit one. Alternatively, if you so choose, the lists can be divided into Current, Future and Past, and can be sorted by date automatically. In the second grouping you'll find "Master Catalog", "Settings" and "Info" (in Packing Pro & Shopping Pro, these three menu items can be accessed via tab buttons on the bottom).
- Create a new list:
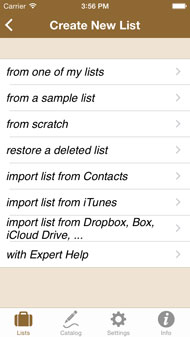
(*Not supported in Shopping)
Once you tap the plus icon on the home page and enter the "Create New List" page, you will be presented with these options:
- "from an existing list"
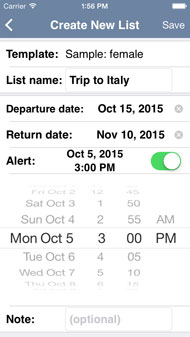
Tap on this, then choose one of your previously created lists. Once tapped, you will be asked to name the new list and give it a date. Either of these can be edited in the future. "Save" this list and start making any modifications to it that you like.
- "from a sample list"
Tap on this, then choose from an option of four included sample lists (eight in Shopping Pro & nine in Packing Pro). Again, you will be asked for a name and date for this new list. "Save" this list and start making any modifications to it that you like. See 'In-app Upgrading + Tip Jar' for even more samples.
- "from scratch"
Tap on this to create a blank list. Once again, you will be asked for a name and date for this new list. Tapping "Save" will actually create the list and bring you to the list detail page, where you can start building the list.
- "restore a deleted list"
Tap on this if you have second thoughts about one of your previously deleted lists and you want to bring it back. If you want to permanently delete any of the lists on the "Restore Deleted" screen, just swipe it from right to left, or tap the "Edit" button to bring up the deletion controls. Tap "Delete All" to permanently remove all of them.
- "import list from Contacts"
Tap on this to create a new list by importing from Contacts. See below for more details.
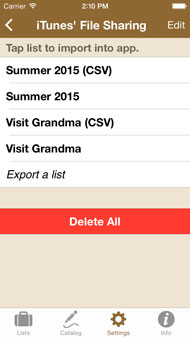
- "import list from iTunes" (*Pro feature)
Tap on this to import (or export) a list via iTunes' File Sharing.
- "import list from Dropbox, Box, iCloud Drive" (*Pro feature)
Tap on this to import a list from various cloud storage providers.
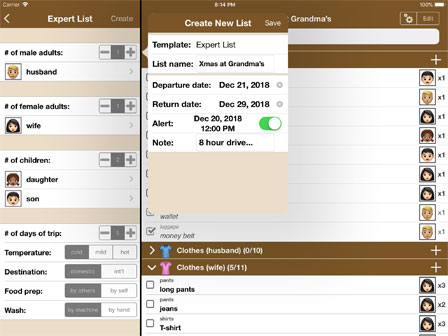
- "with Expert help" (*Pro feature--Packing/Packing Pro only)
Tap on this to quickly and 'automagically' make a list based on the following attributes:
- # of male adults
- # of female adults
- # of children
- # of days of trip
- Temperature (cold / mild / hot)
- Destination (domestic / international)
- Food preparation (by others / by self)
- Wash (by machine / by hand)
Set the attributes as desired and, if you wish, pick or create 'person' labels for each individual on the trip (the app will automatically label each list item accordingly -- very useful for list filtering). Then, "Create" the list, name it, give it a departure date, save it, and then refine it on the packing list detail screen in any way you see fit.
- "from an existing list"
- Edit lists:
On the home page, if you press the "Edit" button, you can do the following things to your lists:
- sort lists
In Edit mode, just touch the three bars to the right of your target list and drag it up or down to manually sort its order.
- delete lists
Tap the empty circle to the left of the target list(s), then tap on the "Delete" button to delete it/them (which also sends the list(s) to the "Restore Delete" lists screen, which functions similarly to a trash can). Also, in normal, non-edit mode, you can swipe to delete these lists as well (from right to left).
- rename, adjust dates, set an alert & leave a note
Tap on the blue arrow to enter the "Edit List Info" screen. Feel free to edit the list name, adjust the departure/return dates, set an alert and add an optional note. "Save" any changes you make, or tap the back arrow (or outside of the popover on an iPad) to cancel the edit.
- set as 'Active List'
Tap the empty circle to the left of the target list, then tap on the "Set as Active List" button to make this your active list (indicated with a red-backgrounded remaining-items circle). If the App Icon Badge has been enabled in Settings, the remaining items number of this list will also be displayed as an icon badge when the app is closed. You can also 'unset' an active list in a similar fashion.
- sort lists
- "Master Catalog":
Tap on "Master Catalog" to access the catalog management pages (see below).
- "Settings":
Tap on "Settings" to access the settings page. Also found there is "iCloud" (Pro feature), "Import / Export / Backup" (Pro feature), "Customized Design" (Pro feature), "Management" (Alerts, Images, People, Bags), "Filter" (Lists), "Sort" (Lists, List Items & Master Catalog) & tax enable & default rate (Shopping / Shopping Pro), among others.
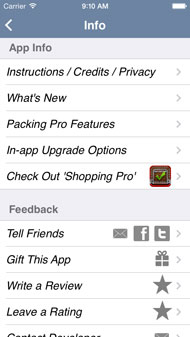
- "Info":
On the home page, tap on "Info" to access all the app and feedback information in one place. On the iPad, you will see this, along with the home menu, on app startup, or by tapping "Info" on the menu. App info includes in-app Instructions & Credits, What's New (update history) and (for Packing / Shopping), Packing Pro (or Shopping Pro) Features & In-app Upgrade & Tip Jar (except for Shopping -- see below), followed by "Check Out Shopping Pro" (or Packing Pro), while Feedback info includes options to contact the developer directly, conveniently tell your friends about the app, gift this app, leave a review or rating on the iTunes App Store, visit QuinnScape's website, Facebook page or Twitter page, or visit the "Other Apps by Quinn" page on the iTunes App Store.
Pro-level Special Features
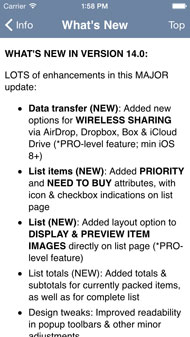
Both Packing Pro & Shopping Pro are super-enhanced versions of their basic matching Packing & Shopping apps. Besides all the great functions and flexibility of these basic apps, Packing Pro & Shopping Pro also feature full iCloud auto-sync support, list & catalog file sharing & out-of-app editing via email, iTunes' File Sharing, AirDrop, Dropbox, Box & iCloud Drive, a huge Master Catalog for easier list creation, twice as many sample lists, app design customization options, a Smart Search function & improved layout for more organized work. In addition, Packing Pro features an Expert list generation tool as well, and Shopping Pro fully supports multiple lists & several list creation/import/export options.
- Full iCloud Auto-sync Support
Automatically keep all of your lists, Master Catalog content & customized settings the same across all of your iOS devices. Seamlessly share lists with other people on the same iCloud account. See below for more info.
- CSV Import / Export
Export your list, list category, catalog category, or entire Master Catalog, edit it on a computer w/ Excel, Numbers, Google Docs, etc., and then re-import it back into the app. You can also copy-and-paste your computer-based list/category/catalog into a blank template and load it into the app for mobile use. See below for more info.
- List & Catalog Content File Sharing & Backup
Now you can share lists or catalog content with family, friends and fellow travelers via email (import/export), iTunes' File Sharing, AirDrop and Dropbox/Box/iCloud Drive. You can send your content across the room or around the world. The convenient '1-tap backup to email' option can serve as a safe, off-app, off-device, off-iTunes, off-iCloud backup, as an extra level of protection for your content.
- Huge Master Catalog
Packing Pro has an extensive Master Catalog containing over 800 items and to-do tasks -- double the size of Packing's catalog -- and includes five extra task-oriented and family-friendly categories: To Do (mid-trip), To Do (post-trip), Babies, Kids & Pets. Shopping Pro has over 1500 food & shopping items in its Master Catalog (double the size of Shopping's) -- and has nine additional categories, including Household Goods, Baby Supplies, Pet Supplies, Personal Care, School Supplies & more.
- Expert List Generation Tool (*Packing/Packing Pro only)
The Expert list generation tool is a powerful function that 'automagically' helps you create a packing list tailored to your specific needs. It employs the following attributes:
- # of people (male adults, female adults, children)
- # of days
- Temperature (cold / mild / hot)
- Destination (domestic / international)
- Food prep (by others / by self)
- Wash (by machine / by hand)
Based on all of the above factors, the Expert tool will generate a highly customized list that you can then use as a starting point for even greater personalization. If you wish, you can choose or create 'person' labels for each individual on the trip (the app will automatically label each list item accordingly -- very useful for list filtering).
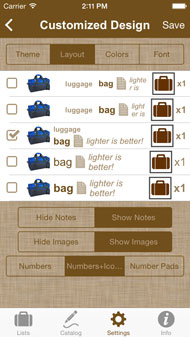
- Customized Design
Another fun and appealing feature that both Packing Pro & Shopping Pro offer is the ability to modify the entire look and feel of the app. No longer are you locked into the dull, gray-scale Apple-standard colors of other typical apps. Now you have complete control over the following:
- Themes
Easily spice up your list-making experience with a single touch by choosing one of several pre-configured sets of pleasing color, font and layout combinations. Pick one to match your next trip, or further customize any to fit your our personality. See 'In-app Upgrading + Tip Jar' for even more options.
- Layout
Choose how, and what, information is displayed on your list detail screen. For example, you can choose to display both the Type and the Item names for each Item, or just the Item name (in larger font). If displaying both Type & Item names, you can choose to show them on the same line, or on two different lines. Newly added options include showing or hiding notes, images, number pads, person & bag icons/emojis (Packing Pro -- very useful for list filtering), and price/subtotal calculations (Shopping Pro).

- Colors & Textures
Pick your own favorite colors for the top bar, background, table cells and text colors. Combine them with background textures for extra effect. Change them whenever you like to match your current mood.
- Font
Choose between over 20 font options for better readability, space management, or simple personal preference.
- Themes
- Twice as Many Sample Lists
Packing Pro, in addition to the four Sample Lists included in the basic Packing app, now offers five more: for couples, for families, for camping trips and for business trips (both male & female). Shopping Pro also offers eight sample lists which could be used as starting points as well as possibly give you new ideas & suggestions.
- Smart Search
Using Smart Search is an easy & intuitive way to find the item, type or category you want, be it located in a list or the Master Catalog. Search by either text entry or barcode scanning (Shopping Pro w/ iOS 8+). Selection takes you to the correct spot in the list, or to the Master Catalog's multi-selection page, or helps add the item directly to your list. If no matching item is found, you can directly create one and add it to your list from here. This function can now also be found on every page of the Master Catalog.
- Superior Layout & Navigation (iPhone / iPod touch)
One of the most obvious differences between Packing and Packing Pro is the improved layout & navigation of Packing Pro (and Shopping Pro, too). You will notice a tab bar at the bottom of the screen, which divides the app into four distinct function groupings:
- Lists: View and manage your lists.
- Catalog: View and manage the Master Catalog.
- Settings: Access the app-wide settings, as well as Import / Export & Customer Design (Pro feature).
- Info: Easily access app info, instructions & feedback options.
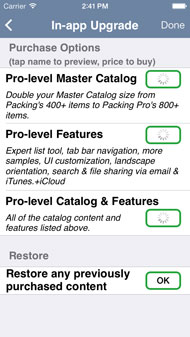
For a more extensive, connected and enjoyable packing or shopping experience, consider Packing Pro or Shopping Pro today! Now, with IN-APP UPGRADE PURCHASING SUPPORT (except for Shopping -- see below), you can save money by downloading content and features directly from within the Packing app (instead of buying the whole Packing Pro app from scratch). Choose between upgrading your Master Catalog to Pro-level (twice as many items), or acquire Pro-level features (all of the above except the Pro-level catalog), or a full combo. The choice is yours!
For Shopping, you can simply download the full-featured Shopping Pro app directly from the App Store.
As for Packing Pro & Shopping Pro, additional sample lists and themes can also be purchased from within the app.
* Please note that, once purchased, you'll need to 'Restore' the purchase (for free, of course) on all of your other iOS devices that share the same Apple ID. Do this on Packing's 'In-app Upgrade + Tip Jar' screen.
List Management
- List overview:

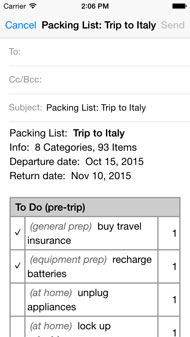
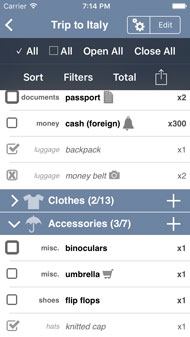
The list detail screen can be accessed from the home page by tapping on any of the lists there. A typical list will have several Categories, each filled with several Items. Each Category can be expanded and collapsed by tapping the Category header bar. Between the open/close indicator and the name, there is an editable icon/emoji. To the right of each Category name (which is also editable), there are two numbers: the first represents the number of Items checked off within that Category, and the second shows the total number of Items in that Category. Thus, '3/5' means that 3 of the 5 Items in that Category have been checked off, or 'packed'/'put-in-the-cart' already, and '8/8' means that all 8 Items in this Category have already been checked. To the far right, there's a plus icon for adding new items to the category.
Each Item has a row that contains a check box on the left, then a Type name (in a lighter color), then the actual Item name, and finally the number of these Items (this Item-line layout can be adjusted with Packing Pro & Shopping Pro -- see "Layout" in "Customized Design"). Items can be checked or unchecked by tapping the check box, or edited by tapping on the name.
In Shopping / Shopping Pro, there will also be a bar at the bottom that shows the total cost of all the items on the list, as well as the total cost of everything currently in the shopping cart (checked off). Optionally, these totals can include one or several tax calculations. Also, when at least one item has been checked off, a 'Checkout' button will appear (see below).
- Add Items to a list:
To add new Items to a list, either tap the plus icon or tap on "Edit". If it's a new list created from scratch, just tap on "Add Item in New Category". For Packing & Packing Pro, all new items will inherit the current 'Person' & 'Bag' filter settings, if any.
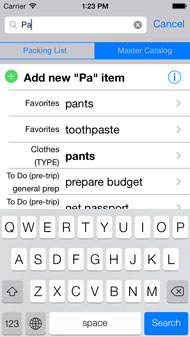
- Direct / Pick / Search
In Edit mode, at the bottom of each Category grouping, you will see three options: Direct, Pick & Search. Direct allows you to type in a new item directly on the list. Search will let you search for an item to add (Pro feature). Tapping on Pick will bring you to a screen listing all the Master Catalog Types of that Category. To the left of each name, you'll see a small empty circle. Tapping it will fill it with red -- this means that you have selected it and ALL of the Items it contains. Tapping it again will clear it. Tap on the name of any Type to move on to the Item list screen. Tapping circles or names here will select or deselect the Item. When an Item is selected here, a number pad will also appear on the right. It indicates the number of that particular Item that will be added to your list. This number comes from the Master Catalog's record for this Item. Tapping + or - will adjust the amount placed in the basket. If you return to the Type list page, you may notice a half-filled red circle -- this means that one or some of the Items of this Type have been chosen, but not all of them. Tapping it will clear all of these Items from your temporary basket. Grayed-out, italicized names indicate that that particular Item, or all of the Items within that Type or Category, are already on the list (this safeguards against accidental duplicate-item entry). Even so, you are still allowed to select that item and add it (as a duplicate) to your list. When you've chosen everything you want, be sure to "Save" it to your actual list.
- "Add Item to New Category"
If you're starting out with a blank list (from scratch), or your current list doesn't yet have a particular Category, then press "Add Item to New Category" (at the bottom of the list). You will be taken to a screen listing all of the Categories in your Master Catalog. To the left of each name, you'll see a small empty circle. Tapping it will fill it with red -- this means that you have selected it and ALL of the Types and Items it contains. Tapping it again will clear it. Tap on the name of any Category to move on to the Type list screen, where you can do the same as above. Tap on the name of any Type to move on to the Item list screen. Tapping circles or names here will select or deselect the Item. When an Item is selected here, a number pad will also appear on the right. It indicates the number of that particular Item that will be added to your list. This number comes from the Master Catalog's record for this Item. Tapping + or - will adjust the amount placed in the basket. If you return to the Type or Category list page, you may notice a half-filled red circle -- this means that one or some of the Items and/or Types of this Type or Category have been chosen, but not all of them. Tapping it will clear all of these Types and/or Items from your temporary basket. Grayed-out, italicized names indicate that that particular Item, or all of the Items within that Type or Category, are already on the list (this safeguards against accidental duplicate-item entry). Even so, you are still allowed to select that item and add it (as a duplicate) to your list. When you've chosen everything you want, be sure to "Save" it to your actual list.
- "Add List/Recipe to List"
This function lets you select any existing list and adds all of its items to the current list. This works especially well for mini-lists like 'carry-on', 'camping equipment', 'baby supplies', etc, or, for the Shopping & Shopping Pro apps, with individual lists added to the family or group list, or mini 'recipe' lists, where you can add all the ingredients to your current shopping list.
When adding a list into your current list, the app will check for any matching items. If a match is found, and ALL of the item details of both items either match or are both blank/unset, then the number attribute of that item on the current list will be set to the sum of these two items (i.e. 'pants' x2 and 'pants' x4 will become one item: 'pants' x6). If no exact match is found, then the item is added to the current list (i.e. 'pants' for HUSBAND and 'pants' for SON will not be merged into one item, but will appear as two line items). In addition, the checkmark for any item added or modified will be reset to unchecked. Lastly, any alert associated with any newly added item will be removed, but any associated with an item currently on the list will remain as is, even if the number of that item has been modified.
New functionality in Packing & Packing Pro now also lets you automatically adjust the 'Person', 'Bag', and 'Need to Buy' attributes for each item imported into the list in this fashion, if a list filter is currently active. Your choices include keeping the original attributes, using the ones from the filter, or resetting all three of them.
- Direct / Pick / Search
- Delete Items:
- swipe to delete
In normal (not Edit) mode, feel free to swipe your finger from right to left across any Item to bring up a "Delete" confirmation button. Delete it, or cancel the action by tapping elsewhere on the list.
- edit mode delete
To delete Items, you can also tap the "Edit" button at the top of the page. Tap the blank circle to the left of whichever item(s) you wish to delete, then tap the "Delete" button below to actually delete it/them. When finished, or to cancel the action, please tap "Done".
- swipe to delete
- Multi-select to Move / Copy / Set Items
Enter Edit mode, choose the Item(s) you wish, and tap the "Move" or "Copy" buttons below. Choose the new location (either within the list or into another list) and confirm the action. Tapping "Set" will give you an option to set the "Person", "Bag" or "Need to Buy" attributes for all of the selected Items (for Packing / Packing Pro), or set the non-default tax rates (for Shopping / Shopping Pro). "Priority" can also be set for any of these apps. Lastly, you can also choose to multi-delete all of the selected as well.
In addition to selecting items one by one, you can now select all of the items in a list category by simply tapping the circle to the left of an opened list category. Please note that it will only multi-select those items that are visible (i.e. not hidden by a filter). Also, those items can be de-selected by either re-tapping that circle or by closing that list category.
- Delete Categories:
To delete whole Categories, first tap "Edit", then tap the red icon to the right of the Category name. A popup will ask you to confirm the action, as it could affect quite a few Items on your list.
- Edit Items:
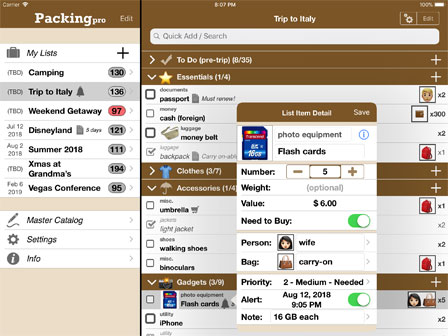
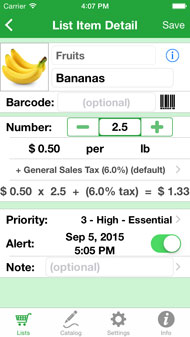
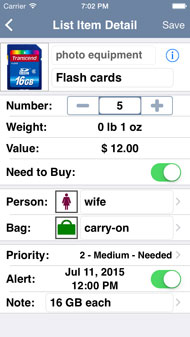
You can edit any Item on your list at any time (in both normal and editing mode). Just tap on the name (or the blue arrow in editing mode), and you will be taken to the "Item Detail" screen. There, you will see the following attributes:
- Type name: Modify it however you wish.
- Item name: Modify it however you wish.
- Image: Attach a photo to your item. Tap once for a bigger view, and tap twice (or press & hold) to pick a new image or delete an exisitng one.
- Barcode**: Represents the barcode of the Item. Enter via typing or scanning (iOS 8+).
- Number: Represents the number or amount of the Item.
- Unit**: Represents the measuring unit of the Item.
- Weight*: Choose between kg / g and lb / oz, and enter the weight of the Item.
- Value* / Price**: Enter the value/price of the Item.
- Need to Buy*: Indicates whether or not item needs to be purchased.
- Person*: Choose the person that this Item belongs to or is associated with.
- Bag*: Choose the bag where this Item is or will be packed.
- Tax**: Tax name & rate of the Item.
- Priority: Indicates importance of an item: 0=Not Needed --> 3=Essential. Reflected by checkmark box on list page.
- Alert: Set a reminder for the Item.
- Note: Add any kind of note here, for your reference.
* Packing / Packing Pro specific attributes.
** Shopping / Shopping Pro specific attributes.
Please note that any changes you make here to the list item will not affect the original, matching item in the Master Catalog (and vice versa), as it became a unique record at the moment it was added to the list. Also, the Image, Barcode, Unit, Weight, Value / Price, Need to Buy, Person, Bag, Tax, Priority, Alert and Note attributes are optional.
- Edit list Category names, icons/emojis & Master Catalog linkage
To edit the name, icon/emoji and/or Master Catalog linkage of a Category on your list, first tap "Edit", then tap on the name of the target Category. Modify the name as you wish, and feel free to replace the default icon with another from the provided list or an imoji. To link this list Category to a different one in the Master Catalog, tap on the "Linked to:" name, choose a Master Catalog Category from the list, and "OK" it. Tap "Done" to save it. Please note that changes made here will only appear on your current list, and will not affect the Master Catalog in any way.
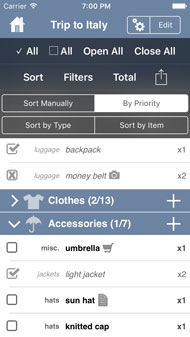
- Sorting list Items
There are many ways to sort the Items on your list. The default method is by hand (manual). Just tap on "Edit" and drag and drop Items (via the 3-line icon to the very right of each item) up or down to wherever you want (even into different Categories). For more powerful sorting options, tap on the gear icon at the top of the page, then tap on "Sort".
- "Sort Manually": No automatic sorting done.
- "Sort by Priority": Automatically sorts all Items (within their own Categories) by Priority, from highest to lowest.
- "Sort by Type": Automatically sorts all Items (within their own Categories) alphabetically by Type. Items with the same Type will also be sorted alphabetically.
- "Sort by Item": Automatically sorts all Items (within their own Categories) alphabetically, regardless of the Types of each Item.
Please note that when using a setting other than "Sort Manually", sorting will be automatic and in real time, so you will not be able to manually drag and drop Items. Also, filtering items in any way will disrupt any manual ordering of Items that you may have already done. If it is important to you to order Items exactly as you wish, then please use the "Sort Manually" sort setting, and the "Show All", "Need to Buy" (OFF) and Person/Bag "(All)" filter settings. If, however, these other sorting & filtering options are of use to you, then please feel free to use them. Also, please note that new items added to the list when either the 'person' or 'bag' filters are set will automatically inherit the same settings.
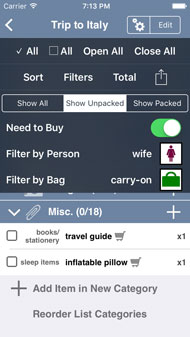
- Filtering list items
For powerful filtering options, tap on the gear icon at the top of the page, then tap on "Filters". Filters can be used to selectively show special parts of the list (and hide the rest). This can be very useful when editing or packing / shopping, or for printing or exporting parts of the list for shopping or for assignment to individuals on that list (Packing / Packing Pro). They can also be used in combinations, i.e. show only the unpacked items for wife's carry-on.
- "Show All": Will show everything on your list (no automatic sorting)
- "Show Unpacked / Unchecked": Will only show Items that are not yet packed / in-your-cart (no check marks)
- "Show Packed / Checked": Will only show Items that are already packed / in-your-cart (have check marks)
For Packing & Packing Pro, there are three more filters:
- "Need to Buy": Will only show Items that have been labeled as 'Need to Buy'
- "Filter by Person": Will only show Items that have been 'assigned' to that particular 'person', to '(All)', or to none, i.e. '(TBD)'
- "Filter by Bag": Will only show Items that have been 'assigned' to that particular 'bag', to '(All)', or to none, i.e. '(TBD)'
- Sorting list Categories:
If you wish to alter the order of the list Category groups, then please first enter "Edit" mode, then scroll to the bottom of the list and tap on "Reorder List Categories". Drag and drop the List Categories into whatever order you wish, and the result is saved automatically.
- Other list functions:
There are several other special functions on the list page. Tap on the gear icon at the top to reveal:
- Check all;
Tap on this to add check marks next to every Item on your list (meaning that everything is 'packed'/'in-your-cart')
- Clear all;
Tap on this to remove all check marks from your list (everything has been 'unpacked'/'not-in-cart')
- Open All
Tap on this to open, or expand, all of the categories on your list.
- Close All
Tap on this to close, or collapse, all of the categories on your list.
- "Total"
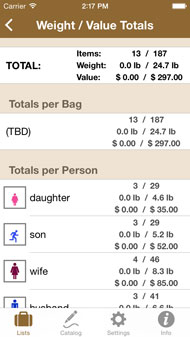
Takes you to a screen with totals and subtotals of the items, weights and values (or on-list and in-cart subtotals for Shopping / Shopping Pro) of all of the Items on your list, calculated by category, as well as by bag and by person (for Packing / Packing Pro). The totals are further broken down by checked-only items vs total list items. This can be very useful for weight-critical camping or mountaineering trips, as well as for avoiding excess and/or overweight baggage fees. The value totals can also come in handy if you are ever unfortunate enough to lose your luggage or have it stolen, especially with insurance claims.
- Smart Search (*Pro feature)
Helps you find the item, type or category you want, be it located in a list or the Master Catalog. Selection takes you to the correct spot in the list, or to the Master Catalog's multi-selection page, or helps add the item directly to your list. If no matching item is found, you can directly create one and add it to your list. With Shopping Pro, you can even scan a barcode and search in-app via that (iOS 8+ required). Search can also be accessed directly on the list page, at the very top of the list. Tap the page title at the top to automatically scroll there from anywhere in the list.
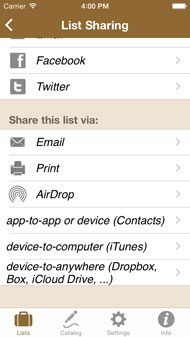
- List Sharing & Printing
Tapping this icon will bring you to a page with lots of options. You can email a text version of your list for easy print out. This email will also have two attached files which you could edit on your computer and re-import into your app (or someone else's) via the Mail app on your iOS device*. You can choose to email this text & attachments as either the full list, or if filtered, as a sub-list, in its current visible, filtered state. You can also export this list as a record in the Contacts app for sharing with other apps or devices ("app-to-app or device"). Additionally, you can export this list as a file into the iTunes' shared folder ("device-to-computer")*, transmit it directly to other iOS devices via AirDrop*, or export it to various cloud storage options, including Dropbox, Box and iCloud Drive*. Besides sharing lists, you can also print them wirelessly (with 1, 2 or 3 column formatting), as well as trade advice, achievements & tips with your family, friends & other travelers via email, Facebook or Twitter.
* Packing Pro or Shopping Pro (or Packing w/ Pro-level in-app upgrade) required for email attachment import and iTunes shared folder import / export, as well as AirDrop & Dropbox / Box / iCloud Drive (which also require iOS 8+).
- Check all;
- Checkout function (*Shopping/Shopping Pro only)
Once at least one list item has been checked off, a 'Checkout' button will appear on the bottom List/Cart Totals bar. Clicking it will give you options to reset the list (uncheck all), remove all checked items, or delete the entire list.
Master Catalog Management
- Master Catalog overview
The Master Catalog contains over 400 items and to do tasks in the Packing app & over 800 in Packing Pro (700+ in Shopping & 1500+ in Shopping Pro). It is organized in a three-level tree structure: Categories, Types, and Items -- but supports two-levels as well: Categories & Items. You can add, delete, rename and reorder any Category, Type or Item that you want. To view and/or edit the Master Catalog directly, just tap on "Master Catalog" on the home page, or tap on the "Catalog" tab on the bottom in Packing Pro / Shopping Pro (on the iPhone / iPod touch).
- Add Categories / Types / Items
You can add new Categories, Types and Items by tapping "(+) New Category" (or Type or Item) near the bottom of the list (in either normal or edit mode). Just type the name you want & hit return to directly add it to the list. If you want to change the default icon (if it's a Category) or details (if it's an Item), tap the blue arrow to enter the detail page. Make the changes you want and press "Done" to save it. If it's a new Category, it's recommended to populate it with one or more Types, and then create several new Items for each of those new Types, or just add Items right under the Category level.
Another way to quickly add new categories, types & items is via the "Quick Add / Search" bar at the top of every Master Catalog page (Pro feature).
- Delete Categories / Types / Items
There are two ways to delete things in the Master Catalog:
- swipe to delete
In normal mode, simply swipe your finger across the target name from right to left, then tap "Delete" to confirm the deletion. To cancel the action, just tap anywhere else.
- edit mode delete
To delete Categories, Types or Items, you can also tap the "Edit" button at the top of the page. Tap the blank circle to the left of whichever name(s) you wish to delete, then tap the "Delete" button below to actually delete it/them. When finished, or to cancel the action, please tap "Done".
Be very careful when deleting Categories or Types from the Master Catalog, as all of their associated Types and Items will also be deleted with that action.
- swipe to delete
- Edit Categories /Types / Items
To edit the name of any Category, Type or Item, first enter editing mode by tapping "Edit", then tap on the target name. Just edit it the way you want directly on the list & hit return to save it. If you want to change the icon/emoji (if it's a Category or Type) or details (if it's an Item), tap the blue arrow to enter the detail page. Make the changes you want and tap "Save" to save it and return to the original listing.
- Edit Item Details
Navigate through the Master Catalog's Categories, Types & Items screens to get to an individual Item's detail screen ("Edit Catalog Item"). There, you will see the following attributes:
- Category: Modify it if you wish to move or copy the Item to another Category (see below).
- Type: Modify it if you wish to move or copy the Item to another Type (see below).
- ITEM: Modify it however you wish.
- Image: Attach a photo to your item. Tap once for a bigger view, and tap twice (or press & hold) to pick a new image or delete an exisitng one.
- Barcode**: Represents the barcode of the Item. Enter via scanning on iOS 8+.
- Number: Represents the number or amount of this Item for this record.
- Unit**: Represents the measuring unit of the Item.
- Weight*: Choose between kg / g and lb / oz, and enter the weight of the Item.
- Value* / Price**: Enter the value/price of the Item.
- Need to Buy*: Indicates whether or not item needs to be purchased.
- Person*: Choose the person that this Item belongs to or is associated with.
- Bag*: Choose the bag where this Item is or will be packed.
- Tax**: Tax name & rate of the Item.
- Priority: Indicates importance of an item: 0=Not Needed --> 3=Essential.
- Note: Add any kind of note here, for your reference.
* Packing / Packing Pro specific attributes.
** Shopping / Shopping Pro specific attributes.
The Image, Barcode, Unit, Weight, Value, Need to Buy, Person, Bag, Tax, Priority and Note attributes are all optional. Please remember that any changes you make here are changes to the Master Catalog. Adding this item to a list after these changes have been made will carry over these details along with the item itself. Afterwards, if wished, they can still be overridden within the list itself.
- Move / Copy Types / Items
To move or make a copy of any Type, first enter editing mode by tapping "Edit", then tap on the target Type. For Items, just go to that Catalog Item's detail page (see above). Tap on the Category or Type name to enter a screen listing all of the current alternate options. Pick one and "OK" it, or hit "Back" to return to the previous screen. If the target is an Item, and you've chosen a different Category for it, be sure to choose an appropriate Type as well. Once ready, tap "Save" and pick one of the options: "Move it" to remove the Item or Type from its current location and add it to the new one, or "Copy it" to leave the Item or Type in its current location, while creating a duplicate in the new location.

- Multi-select to Move / Copy / Set Types / Items
Enter Edit mode, choose the Type(s) and/or Item(s) you wish, and tap the "Move" or "Copy" buttons below. Choose the new location and confirm the action. Tapping "Set" will give you an option to set the "Person", "Bag" or "Need to Buy" attributes for all of the selected Items (no Types) (for Packing / Packing Pro), or set the non-default tax rates (for Shopping / Shopping Pro). "Priority" can also be set for any of these items. You can also select one or more Types or even Categories to group-set all of the items within them. Lastly, you can also choose to multi-delete all of the selected as well.
- "Smart Search" (*Pro feature)
At the top of every Master Catalog page, you can quickly find existing elements or add new ones via the "Quick Add / Search" bar. Tapping on a 'found' item will take you there, screen by screen, so you can better understand its place in the hierarchy. For new, unique categories, types or items, just tap to instantly add it to your Master Catalog.
- Sort Categories / Types / Items
To sort a Category, Type or Item, first enter editing mode by tapping "Edit", then drag and drop the names however you wish. Tap "Done" to save your changes. On the Settings page, you can also choose to sort any or all of these three levels automatically in alphabetical order.
- "Clone a Category"
Easily make a copy of any existing Category you wish. Give it a unique name, like "Clothes (husband)" and use it in any of your lists.
- Restore deleted Categories
To restore / recover a previously deleted Master Catalog Category, tap on "restore deleted category" on the "Categories" page. Tap on any Category there to undelete it and return it to the Master Catalog. If you want to permanently delete any of these Categories, either swipe to delete it (from right to left) or enter editing mode to delete it. Tap "Delete All" to permanently remove all of them.
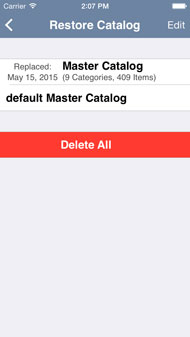
- Restore previous Master Catalogs
To restore / recover a previously replaced Master Catalog, tap on "restore Master Catalog" on the "Categories" page. Tap on any Master Catalog listed there to make it the current Master Catalog. The previous Master Catalog will now show up on this list, with a date when it was replaced (today) and how many Categories and Items it contains, for future reference. If you want to restore the default Master Catalog (from the most current version), tap on "default Master Catalog". If you want to permanently delete a Master Catalog, either swipe to delete it (from right to left) or enter editing mode to delete it. Tap "Delete All" to permanently remove all of them.
Import / Export / Backup
(*Not supported in Shopping, except for email export of list.)
- Import / Export vs. iCloud:
For users of Packing Pro or Shopping Pro (or Packing with Pro-level or Full in-app upgrade), iCloud auto-sync support should eliminate the need for almost all manual importing or exporting. Once activated, it will keep all of your lists, catalog content & settings synced and up-to-date on all iOS devices connected to the iCloud under the same iCloud account. (See iCloud section below.) In other cases, such as two or more people with different accounts, or the desire to edit a list, category, or entire Master Catalog on a computer, or for users of the basic Packing app, please refer to the import/export options described below (#2 to #7).
Another plus of using iCloud is that, besides your lists, catalog content & settings, it will also sync your alerts and item image files. None of the various import / export methods can do that.
Also, please note that currently, only similar-type data can be imported into each type of app, i.e. packing lists & packing-related catalog content into Packing / Packing Pro, and shopping lists & shopping-related catalog content into Shopping Pro.
- Import / Export / Backup overview:
Accessed via the "Settings" page, this Import / Export function allows you to do several things:
- copy list Categories from one list to another
- quickly build a modular list from scratch
- backup your lists and catalogs outside of the actual app
- copy lists & Master Catalogs (and their Categories) between Packing & Packing Pro on the same device
- copy any of the above between other iPhones, iPod touches & iPads (*with the help of one of several available free, 3rd-party apps)
- use iTunes' File Sharing to move list or catalog files between your device & computer (*Packing Pro / Shopping Pro / Pro-features)
- attach list, category or Master Catalog files to an email, and re-import it back into the app -- made especially easy with '1-tap backup to email' function (*Packing Pro / Shopping Pro / Pro-features)
- use AirDrop to directly transmit list or catalog content to another iOS device (*Packing Pro / Shopping Pro / Pro-features, min iOS 8+)
- import/export list & catalog content to & from cloud storage providers, including Dropbox, Box, iCloud Drive and more (*Packing Pro / Shopping Pro / Pro-features, min iOS 8+)
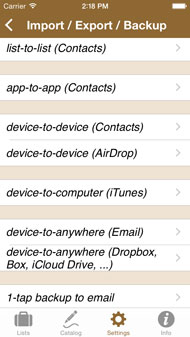
As you can see, this function greatly expands the reach & mobility of your data. All exported data (except for email attachments, iTunes' File Sharing files, AirDrop, Dropbox/Box/iCloud Drive) is stored in the device's Contacts app under names starting with ".Packing..." or ".Pack..." or ".Shop...", so they will appear out of your way, at the bottom of your Contact list. Feel free to delete them after you've made your transfer, either from within the app or in Contacts, but please don't directly alter any of the data from within Contacts. You can also keep this data in Contacts as a form of long-term backup. The following instructions (#3 to #7) describe the 'Contacts' way of importing & exporting, as used by the "list-to-list", "app-to-app" and "device-to-device (Contacts)" options on the Import / Export "Choose Type" screen.
For non-Contacts-based methods, please see further below for the "device-to-device (AirDrop)", "device-to-computer" (iTunes' File Sharing), "device-to-anywhere" (export as email attachment) & "1-tap backup to email" methods.
Also, regardless of how you import a list, any unique items on that list but not yet present in the Master Catalog will also be added to it, automatically.
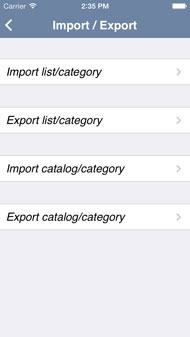
- Lists / list Categories:
- Exporting
From the "Import / Export" page, choose "Export list / category". Tap on your target list, and then choose to export either the entire list, or part of it (one of its Categories).
- Importing
From the "Import / Export" page, choose "Import list / category". As you can see, there are several details about each record here: list or list Category name, date exported, # of Categories & Items (for lists) and list origin (for list Categories). Tap on anything under "Packing Lists" (or "Shopping Lists") to import that list into your app. Tap on anything under "Packing List Categories" (or "Shopping List Categories") to import a particular list Category. You will be asked to choose a list destination for this imported list Category. If the name of your imported list or list Category matches an existing one, you will be presented with these options:
- rename imported category (or list)
- rename existing category (or list)
- replace old with imported
- Merge the two
- cancel
Choose one, change the name, if necessary, and continue your work.
- Permanent delete
If you want to permanently remove any of these records from the "Item to Import" list, you can swipe to delete (from right to left), or just tap "Edit", delete them, and tap "Done", or tap "Delete All" if that's what you want. You can also remove them from within Apple's Contacts app, but it is much easier and clearer to do it from here.
- Exporting
- Master Catalog / Categories:
- Exporting
From the "Import / Export" page, choose "Export catalog / category". Choose to export either the entire Master Catalog, or part of it (one of its Categories).
- Importing
From the "Import / Export" page, choose "Import catalog / category". As you can see, there are several details about each record here: Master Catalog or Category name, date exported, # of Categories & Items (for Master Catalogs) and # of Types and Items (for Categories). Tap on anything under "Master Catalog Categories", and it will be added to your Master Catalog. Tap on anything under "Master Catalogs" and it will replace your current Master Catalog with this new imported one. Your former Master Catalog can still be found (and restored) from the "Restore Catalog" page found via the "Edit Master Catalog" option on the home page.
If the name of your imported Category matches an existing one, you will be presented with these options:
- rename imported category
- rename existing category
- replace old with imported
- Merge the two
- cancel
Choose one, change the name, if necessary, and continue your work.
- Permanent delete
If you want to permanently remove any of these records from the "Item to Import" list, you can swipe to delete (from right to left), or just tap "Edit", delete them, and tap "Done", or tap "Delete All" if that's what you want. You can also remove them from within Apple's Contacts app, but it is much easier and clearer to do it from here.
- Exporting
- Sharing content between apps:
To transfer data between apps (i.e., Packing to Packing Pro, or vice versa) on the same device, first export your desired content from one app, then open the other app and import it (see instructions above for how to import and export content).
- Sharing content between devices:
*For users of Packing Pro or Shopping Pro (or Packing with Pro-level or Full in-app upgrade), it is recommended to use the more-convenient "device-to-device (AirDrop)" or "device-to-anywhere" methods instead.
To transfer data between devices (i.e., iPhone to iPhone, iPod Touch to iPhone, iPhone to iPad, etc.), first export whatever you want from the first device. It will be stored in Contacts. Then, open another, 3rd party app to copy or sync that particular 'contact' to the other device. Currently, there are several free apps that can help you do this, such as "Mover" and "Bump". Alternatively, you could use iTunes to sync your address book contacts (including this just-exported data) first to the computer, and then to the second device. After that, open your Packing / Packing Pro / Shopping Pro app on the second device and import the transferred data.
- Out-of-app, out-of-device backup
All of this 'exported' data now is stored in Apple's Contact app. You'll be able to re-import it in case anything happens to your Packing / Packing Pro / Shopping Pro app. Since the data is stored in Contacts, it could automatically get backed up to your computer every time you do an iTunes sync (if set to do so in iTunes). This is, in essence a double-redundant backup. If anything were ever to happen to your iPod Touch / iPhone, you could simply 'restore' it, and all of your 'backed up' Packing / Packing Pro / Shopping Pro content, via iTunes.
For off-app, off-Contacts, off-device, off-iTunes & off-iCloud backups, see #10 & #13 below.
- "device-to-device (AirDrop)" (*Pro feature)
This method allows you to directly transmit your list or catalog content to a nearby iOS device. Be sure that both devices have their Wi-Fi and Bluetooth services turned on.
- "device-to-computer" (*Pro feature)
This method uses iTunes' File Sharing feature. Choose what to export (list, list category, catalog category or Master Catalog) to save it as a file in a folder that is accessible by your computer through iTunes. Connect your device to your computer, open iTunes, click on your device (under 'Devices' in the left menu), and then on the 'Apps' tab. Scroll down to File Sharing and click on Packing / Packing Pro / Shopping Pro to reveal the files in the Documents pane. Save it to your computer, or Add another ".packinglist", ".shoppinglist", ".listcategory", ".catalogcategory", ".mastercatalog" or ".csv" formatted file to that directory. Once added, you'll be able to import and open it in your app by just clicking on its name on the "iTunes' File Sharing" screen.
- "device-to-anywhere"
- Via Email
This method allows you to export a list, list category, catalog category or the entire Master Catalog as a text list (lists only) and attached files (in the Packing / Packing Pro / Shopping / Shopping Pro-specific ".packinglist", ".shoppinglist", ".listcategory", ".catalogcategory" or ".mastercatalog" format and CSV format). You can choose to email this text & attachments as either the full list, or if filtered, as a sub-list, in its current visible, filtered state. To import it, you'll need Packing Pro, Shopping Pro or Packing + Pro-level Features (or Full). Just open the email on your device's Mail app, scroll down to the bottom of the text, tap the attachment, and choose either Packing, Packing Pro or Shopping Pro. Feel free to share your lists or catalog content with any of your family, friends or traveling companions.
- Via Dropbox / Box / iCloud Drive
This method allows you to import or export a list, list category, catalog category or the entire Master Catalog (in the Packing / Packing Pro / Shopping / Shopping Pro-specific ".packinglist", ".shoppinglist", ".listcategory", ".catalogcategory" or ".mastercatalog" format as well as CSV format) to and from various cloud storage providers. You can choose to export list content as either the full list, or if filtered, as a sub-list, in its current visible, filtered state. Feel free to share your lists or catalog content with any of your family, friends or traveling companions.
- Via Email
- Out-of-app, out-of-device editing via CSV (*Pro feature)
CSV (Comma Separated Values) is a common file format for transferring & using data between different platforms and applications. By exporting a CSV-format list, list category, catalog category or Master Catalog from the app, either via email attachment, iTunes File Sharing or Dropbox/Box/iCloud Drive/etc, you'll be able to edit it on a computer with Windows' Excel, Mac's Numbers, Google Docs, or other similar applications. With a full keyboard & copy & paste, you'll be able to easily edit your content or convert a previous, computer-based list/category/catalog into the right format for import back into the app.
Though common, CSV does have its quirks. While every app-exported list should be importable by the following three apps (and most others as well), saving them there can sometimes be a problem:
- for Numbers: When done, 'Export' the file as 'CSV' in 'Unicode (UTF-8)' format
- for Google Docs: When done, from the file detail editing page, choose 'File', 'download as' and 'CSV (current sheet)'
- for Excel: When done, choose 'Save as', 'Other file type' and 'Unicode'. Then, you'll need to rename the '.txt' extension to '.csv'
Besides the above, be sure to maintain the original file's column number & header items, list only one item or task per line, and include values for at least the "Item" & "Category" fields for each item (other fields are optional). Feel free to export a blank list ('from scratch') as a list template into which you can cut & paste your existing, computer-based list -- no retyping necessary! For categories & the Master Catalog, create a blank template by first creating a new category from within the app, then export it via email or iTunes. To import an edited file back into the app, just attach it to an email or use iTunes' File Sharing.
- .csv vs .packinglist / .shoppinglist / .listcategory / .catalogcategory / .mastercatalog formats
The .packinglist, .shoppinglist, .listcategory, .catalogcategory & .mastercatalog files preserve all of your in-app formatting, but can only be used within the app itself. The .CSV file can be edited outside the app with Excel, Numbers, Google Docs, etc, but at the cost of some minor formatting losses. Such losses include category icons/emojis, category-catalog matches, person/bag icons/colors/emojis and weight/value units, though many of these should be matched automatically for you upon import. Please note that neither method can export alerts or item image files.
Once again, please note that currently, only similar-type data can be imported into each type of app, i.e. packing lists & packing-related catalog content into Packing / Packing Pro, and shopping lists & shopping-related catalog content into Shopping Pro.
- "1-tap backup to email" (*Pro feature)
Now, with just a single tap, you can conveniently back up all of your lists and Master Catalog content to email. Email it to yourself as a form of off-app, off-Contacts, off-device, off-iTunes, off-iCloud backup, as an extra precaution. The app will also periodically remind you to do so, once per month of moderate to heavy usage of the app.
- Merging content
When importing lists, list categories or catalog categories with existing, matching-named ones already in the app, besides having the options to rename or replace, you may also merge the content. This will add unique, non-matching items from the incoming content to the existing content. Entire, incoming Master Catalog content can also be merged like this, if desired. For list content, it will total the numbers of (exactly) matching items. With Packing/Packing Pro, if any filters are active, you'll also be giving the choice to automatically set the filterable attributes of the incoming items to those settings (i.e. PERSON, BAG, NEED TO BUY). You can also RESET/clear them, or keep their original values. Used wisely, these totaling & filtering behaviors can be quite useful.
iCloud auto-sync support (*Pro feature)
- iCloud overview
iCloud is an auto-syncing service provided by Apple to help keep the data on all of your devices synchronized & up-to-date. With Packing Pro & Shopping Pro (or Packing with Pro-level features or Full in-app upgrade), iCloud will help keep all of your lists, Master Catalog content & customized settings the same across all of your iOS devices. For devices logged onto the same iCloud account, changes made on one device will auto-sync to all of your other devices within a few seconds (or up to a few minutes, depending on iCloud's speed). Changes will automatically appear on other devices. In the event that changes were made on two or more devices at the same time, or while one was offline, the app will attempt to merge the sets of data. Master Catalog changes will undergo an 'additive merge', whereas list data will auto-select & keep the most-recently-saved lists. Therefore, it is recommended that you not edit the same list on two or more devices at the same time.
iCloud auto-sync will also transfer both item image files & alerts to your other devices. In the case of alerts, though, since they are tied into each device's system, you'll need to actually open the app in the other devices for the alerts to sync and then be registered and set in that device's system.
If you are running iOS 8 or above, please be sure to enable iCloud Drive on ALL of your other devices. FYI, iCloud Drive accounts, Apple's new standard, will no longer be able to sync with pre-iOS 8 iCloud accounts or devices.
- Turning iCloud ON
First, be sure that you are logged onto an iCloud account, that the 'Documents & Data' setting in ON, and that you have Internet access. Check these things in the device's Settings app.
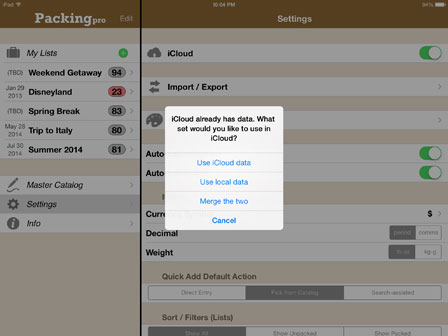
Next, open Packing Pro / Shopping Pro (or Packing with Pro-level features or Full in-app upgrade) and, to be extra careful, email-export your most important lists, as a form of off-app, off-device backup. Then, go to the app's Settings page and switch iCloud ON. If you already have Packing / Shopping data on iCloud, you'll be given three choices of what data to use: iCloud's, your own current data, or a merged set of the two.
- Turning iCloud OFF
Though not really recommended, it is possible to shut off iCloud support for this app. After throwing the switch you will be asked what data you would like to use now on your device: a copy of iCloud's current content, the data that was auto-backed up before you switched on iCloud, or the data from the most recent auto-backup (usually from the end of the previous session). You will also be given a choice to keep iCloud's data intact (for other devices to use), or to delete it (other devices would no longer be able to access it).
Also, please note that shutting off iCloud will also transfer any item image files you may have in the app from iCloud storage to the local device (your app photo library will 'follow you'). Other devices accessing iCloud data (if you didn't choose to delete it) would not have access to those images.
Alerts
Alerts, or reminders, can be set for lists and for list items & to-do tasks. You can set a date & a time and the iOS device will remind you at that time, regardless of whether or not the app is actual running. If the app is not running, tapping or sliding the system notification will open the app and give you a choice to view the list, delete the alert or just close the popup. The same choices will be given if you're alerted while using the app. The app will also remind you of any alerts you might have missed since last using the app.
For users of Packing Pro, Shopping Pro, and Packing (+TO DO!) w/ Pro-features or Pro-full in-app upgrades, if you're using iCloud, it can help you transfer these alerts to your other iOS devices. You must, however, open the app on your other device(s) in order for the alerts to be properly transferred and set. This must be done for any newly created or deleted alerts to take effect on any other devices.
Lastly, a centralized Alert Management page can be found on the Settings page. There, you can conveniently view, edit & delete any of the past or future alerts you have set.
In-app Upgrading & Tip Jar
In-app upgrade purchase options are available via the Info page of the basic Packing app, Packing Pro & Shopping Pro. Now, you can cheaply and easily upgrade the basic Packing app to a Pro-level Master Catalog, Pro-level feature set, or the full Pro-level combo (catalog + features). The Pro-level catalog includes over twice as many additional items, while the Pro-level feature set includes iCloud auto-sync, an Expert list-generation tool, design customization, easy tab bar navigation, more samples, Smart Search function and packing list, category & Master Catalog file sharing & out-of-app editing via email and iTunes' File Sharing. Once purchased, it's yours forever, and can be restored on other devices you may have under your iTunes account.
For Packing Pro & Shopping Pro users (and for basic Packing users with Pro-features or Pro-full upgrades), there are in-app options to purchase 10 additional sample lists and 12 additional design themes. For owners of both Packing Pro & Shopping Pro, the 12 additional design themes for both apps are FREE! Most recently, a Photo Option for Person & Bag item attributes has been added for users of Packing Pro and Packing users with Pro-features or Pro-full upgrades.
For Shopping, you can simply download the full-featured Shopping Pro app directly from the App Store.
* Please note that, once purchased, you'll need to 'Restore' the purchase (for free, of course) on all of your other iOS devices that share the same Apple ID. Do this on the 'In-app Upgrade + Tip Jar' screen.
Lastly, there's also a Tip Jar, where you can voluntarily make additional donations to help the developer continue to provide bug fixes, iOS upgrade modifications & other enhancements to the app. Any additional support is greatly appreciated.
Problems & Troubleshooting
- Import / Export problems
- AirDrop, Dropbox & iCloud Drive
Sometimes, it may require several attempts to connect to other devices via AirDrop. Be sure to switch on Bluetooth and make sure that both devices are on the same WiFi network (and logged in to it). Using Dropbox, too, can be a bit spotty, especially when importing -- just try again. As for iCloud Drive, currently, it doesn't allow users to overwrite files already saved there -- a problem when trying to use it for manual syncing.
- CSV formatting
Please review file-based "device-to-computer", email-based "device-to-anywhere" or CSV-specific instructions first. If you are still having problems with category or Master Catalog importing, be sure that the file name contains the text 'category' or 'catalog' (whichever one is appropriate). For list categories, the file name must contain the text 'ListCategory'.
- AirDrop, Dropbox & iCloud Drive
- iCloud problems
If the app seems sluggish or unresponsive, or menus, text fields and keyboards keep closing prematurely, you may be experiencing an 'iCloud merge loop'. This sometimes happens on iOS 8/9 devices that have not yet been upgraded to iCloud Drive. Enabling iCloud Drive in the Settings app of ALL of your devices should clear up all of these issues. FYI, iCloud Drive accounts, Apple's new standard, will no longer be able to sync with pre-iOS 8 iCloud accounts or devices.
If iCloud seems to stop syncing, or starts showing multiple error popups, please close the app, and then quit its background session by pressing the home button twice and swiping the screenshot up off the display. Wait 1-2 minutes, and repeat on your 2nd device. Then, restart the app, and repeat with the 2nd device after a 1-2 minute pause. There hopefully shouldn't be any problems after that. Please note, though, that there can be a bit of a lag when using iCloud, so try not to make changes on both devices too close in time to each other (i.e. within 1-3 minutes).
Feedback, Contact, Privacy Policy & Website Info
Please feel free to send me any comments, questions or suggestions about this or any of my other apps. If you have experienced any problems or errors, describe them to me and I'll try to fix them as soon as possible. Your feedback is greatly appreciated.support@QuinnScape.com
QuinnScape.com
facebook.com/QuinnScape
twitter.com/QuinnScape
pinterest.com/QuinnScape
QuinnScape.com/PrivacyPolicy.asp
Credits
Programming & design: Quinn GenzelConsulting & testing: Ai-wei Chao
App icon & splash screen: Jon Wilcox
Website CSS & JS foundation (under MIT license):
- Bootstrap: getbootstrap.com/getting-started/#license-faqs
- TGW (theworkinggroup): blog.twg.ca
- Joseph Wain/Glyphish: www.penandthink.com
All rights reserved